If you would like to have others assist in test setup you can either update permissions for existing users for the current administration or you can add new users and designate them as teachers.
Adding a New User to the Portal
When you add a user to the Portal, specify the permissions the user will have.
Note: Teachers no longer need to be manually added to teacher management, teachers are automatically added to teacher management when they are granted user access with the Teacher role.
Designating users as teachers in the portal - users no longer need to upload teachers to teacher mgmt. This process is done automatically when they are added as a teacher user. Can be removed
- Open the My Applications menu bar and select User Management to display the User Administration page.
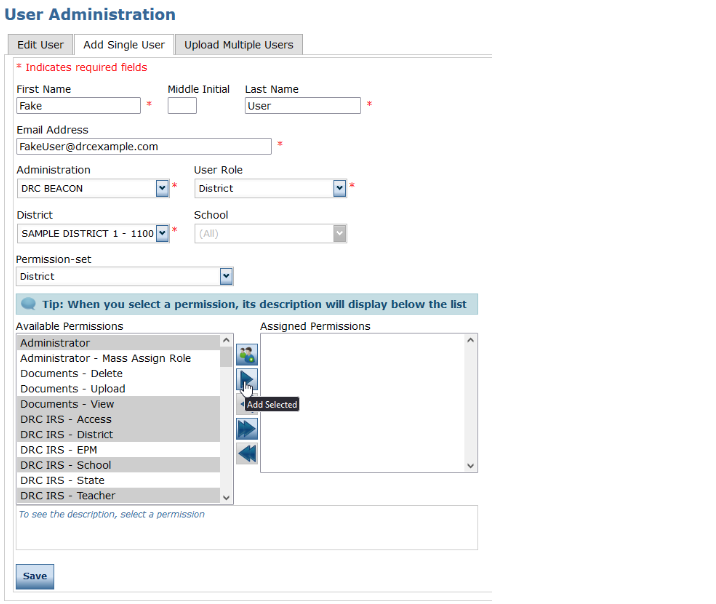
Note: On the User Administration page, select a permission set under Available Permissions to see the assigned permissions for the selected permission set (role). You can add or remove assigned permissions as needed. - To add a user, select the Add Single User tab.

- Fill out the required fields and options from the drop-down menus. A required field or option has a red asterisk (*) next to it.
- Select a permission from the Available Permissions list and click the Add Selected icon (
 ) to assign the permission to the user. A description of the permission selected displays beneath the list of permissions.
 - Click Save when you are finished assigning permissions.
Here is a video tutorial of the same information.
From the User Administration page, you can upload a file containing multiple users to the Portal. The file must meet certain requirements (outlined below).
Note: After the file has been uploaded successfully, you must assign Portal permissions for each role included in the file. The permissions assigned to each role are granted to each user with that role. If there are users that require slightly different permissions, you can add or remove permissions from each user individually using the View/Edit button on the Edit Users tab.
- Open the My Applications menu bar, click User Management to display the User Administration page, and select the Upload Multiple Users tab.
- Use the drop-down menu filtering option to select the correct administration. The Upload Multiple Users tab contains links to both a sample PDF file that contains instructions and a sample .csv file that you can use to create the actual file.Click the Download the File Layout link to display the Batch User Upload File Layout file. This file displays the required layout of the .csv file you will upload to DRC with rules, instructions, and examples describing how to create and format the file.Click the Sample File link to download or display the Sample Users spreadsheet file. This file is only a sample of the type of file you will upload to DRC.Note: Depending on the browser you are using, a dialog box may appear for you to use to open or download the file.
- Use the sample users spreadsheet file to create, rename, and save a user file to upload.Note: Be sure to keep the header column rows in the file you upload.
- After you have created a user file, click Browse... to locate it, select the file, and click Open to display it in the File field of the Upload Multiple Users tab.
- Click Upload. A message displays indicating the file has been transferred and is being checked for errors. After the file has been validated, you can review its status. If the file contains errors, you must correct them and repeat Steps 4 and 5
Here is a video tutorial of the same information